windows 10

Windows 10 – How To Easily Take A Screenshot

Screenshots have become an integral part of our digital lives, whether for capturing memorable moments, saving important information, or sharing content with others. In Windows 10 taking a screenshot is a simple yet powerful feature that can be utilized in various scenarios. In this guide, we’ll explore the different methods available in Windows 10 to easily capture screenshots, catering to both basic and advanced user needs.

Understanding the Basics of Screenshots:

Before diving into the methods of taking screenshots in Windows 10, it’s essential to understand the different types of screenshots and their uses.

  • Full-screen screenshot: Captures everything displayed on your monitor.
  • Windowed screenshot: Captures only the active window, excluding other open windows.
  • Region screenshot: Allows you to select a specific area of the screen to capture.

Each type of screenshot serves a distinct purpose, providing flexibility based on your requirements.

Windows-10 Using Keyboard Shortcuts:

Windows 10 offers built-in keyboard shortcuts for quickly capturing screenshots without the need for third-party software. These shortcuts are efficient and easy to remember:

  • Full-screen screenshot: Press the “PrtScn” (Print Screen) key on your keyboard. This captures the entire screen and copies it to the clipboard.
  • Windowed screenshot: To capture only the active window, press “Alt + PrtScn.” This action copies the screenshot of the active window to the clipboard.
  • Region screenshot: For capturing a specific region, press “Win + Shift + S” to open the Snipping Tool, then drag to select the desired area. The screenshot is automatically copied to the clipboard and can be saved or edited using the Snipping Tool.

Keyboard shortcuts offer a quick and convenient way to capture screenshots on Windows , ideal for users who prefer efficiency in their workflow.

Utilizing the Snipping Tool:

Windows 10 includes a built-in utility called the Snipping Tool, designed specifically for capturing screenshots and annotating them if necessary. Here’s how to use it:

  • Open the Start menu and search for “Snipping Tool.”
  • Once open, select the desired snip type: Free-form, Rectangular, Window, or Full-screen.
  • After selecting the snip type, drag the cursor to capture the desired area.
  • The captured screenshot will appear in the Snipping Tool window, where you can annotate it using the available tools.
  • Finally, save or share the screenshot directly from the Snipping Tool interface.

The Snipping Tool provides additional flexibility and customization options compared to basic keyboard shortcuts, making it a versatile tool for capturing and editing screenshots.
Windows 10

Introducing Snip & Sketch:

In addition to the Snipping Tool, Windows 10 introduced Snip & Sketch, an enhanced tool for capturing and annotating screenshots. Here’s how to use it:

  • Press “Win + Shift + S” to open Snip & Sketch, or search for it in the Start menu.
  • Snip & Sketch offers various snipping options: Rectangular Snip, Freeform Snip, Window Snip, and Full-screen Snip.
  • After capturing the screenshot, it will be automatically saved to the clipboard, and a notification will appear, allowing you to annotate or share it directly.
  • Alternatively, you can access the screenshot from the Snip & Sketch interface, where you can annotate it using the available tools.
  • Snip & Sketch also offers additional features such as delayed snip and touch-friendly markup tools, enhancing the screenshot-taking experience.

Snip & Sketch provides a modern and intuitive interface for capturing and editing screenshots, catering to users who prefer a more streamlined approach.

Leveraging Game Bar for Gaming Screenshots:

For gamers, Windows 10 includes a feature-rich tool called Game Bar, which not only allows for capturing screenshots but also recording gameplay footage. Here’s how to use it:

  • While playing a game, press “Win + G” to open the Game Bar overlay.
  • Click on the “Screenshot” button (camera icon) to capture a screenshot of the game window.
  • Alternatively, use the keyboard shortcut “Win + Alt + PrtScn” to capture a screenshot without opening the Game Bar overlay.
  • The captured screenshots will be saved to the “Captures” folder under Videos in your user profile directory.

Game Bar offers convenient functionality for gamers to capture memorable moments during gameplay effortlessly.

Exploring Third-Party Screenshot Tools:

In addition to the built-in tools provided by windows 10, there are numerous third-party screenshot utilities available that offer advanced features and customization options. Some popular options include:

  • Green shot: A lightweight and open-source screenshot tool with advanced editing features and customizable hotkeys.
  • Light Shot: A feature-rich screenshot tool with easy sharing options and built-in image editor.
  • Snagit: A comprehensive screenshot and screen recording software with advanced editing capabilities and cloud integration.

Third-party screenshot tools cater to users with specific requirements or preferences for additional features beyond the native windows 10 options.

Conclusion

Taking a screenshot in windows 10 is a simple yet versatile task that can be accomplished using various built-in tools and shortcuts. Whether you prefer the convenience of keyboard shortcuts, the flexibility of the Snipping Tool, the modern interface of Snip & Sketch, or the gaming-focused functionality of Game Bar, Windows 10 offers a solution for every user’s screenshot needs. Additionally, third-party screenshot tools provide advanced features for users seeking more customization options. By mastering these screenshot methods, you can effortlessly capture and share moments from your windows 10 experience.

Windows 10 Key

How to Legally Get Windows 10 Key for Free or Cheap

Discover the legal ways to obtain a Windows 10 key for free or at an affordable cost

If you‘re looking for a cheap Windows 10 key, then you‘ve come to the right place. At Affordablekey.com, we‘re the best seller of Windows 10 keys, and we‘re offering a promo code for a 30% discount on your purchase. There are a lot of websites out there that sell Windows 10 keys, but we think that ours is the best.

Here‘s why: We offer the best prices. We have a wide selection of keys to choose from. We offer a promo code for a 30% discount on your purchase. We have a userfriendly website. We offer customer support. So, if you‘re looking for a cheap Windows 10 key, then head over to our website and use the promo code BLACKFDAY at checkout to save 30%.

Windows 10 key Retail License Product Price

You can buy a cheap Windows 10 key from a number of different websites. The bestseller website for Windows 10 keys is Affordablekey.com. You can use the promo code BLACKFDAY to get a 30% discount on your purchase.

The best website to buy a Windows 10 key from is CDKeys.com. You can find a number of other websites that sell Windows 10 keys, but the prices are often higher.
The bestseller website for Windows 10 keys is Affordablekey.com. You can use the promo code BLACKFDAY to get a 30% discount on your purchase.

Get Windows 10 Key for Free or Cheap

Affordablekey is the best website to buy a Windows 10 key from because they are a reliable source and you can trust that the key you purchase will work. They also have a 30% off promo code, which makes their keys the most affordable on the internet.

CDKeys is another great website to buy a Windows 10 keys from. They are also a reliable source and their keys are known to work. They are often slightly more expensive than Affordablekey, but they do offer a price match guarantee.

There are a number of other websites that sell Windows 10 keys, but the prices are often higher. If you are looking for the best deal, then you should definitely check out Affordablekey and CDKeys.
You can use the promo code BLACKFDAY to get a 30% discount on your purchase.


browser in Windows 11

How to change your default browser in Windows 11

How to change your default browser in Windows 11

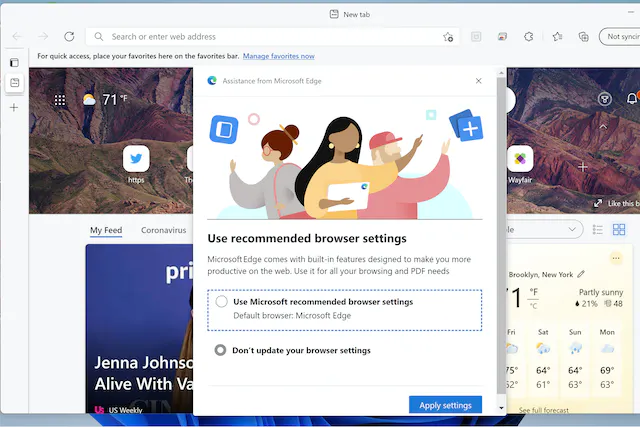
If you’ve recently upgraded your computer to Windows 10 to Windows 11 You may have seen that whenever you click the link to a website or PDF file or any different file types you’ll be taken directly to the Microsoft Edge browser. In the latest version of Windows, Microsoft seems to have become more active in promoting its own apps over applications that were installed as defaults prior to the upgrade. This means that Edge was suddenly the default browser.

Windows 11

Typically, the first time you enter another browser that’s not Edge like, for instance, Google Chrome — the browser that is not Edge will ask you to make it your default. However, the procedure for changing the default settings for defaults in Windows 11 has become more complicated than before Windows 10. This means that you won’t get that helpful request — or, if there is one, you will lead you to a confusing webpage that is titled App > default applications. If that’s the case, here’s how to change.

Switch default browsers

If you do not wish for Edge to become your preferred browser and your preferred browser isn’t willing to change it for you, or if it is offered, but directed yours to the default apps page mentioned above there’s how you can change to the default. For this instance, I’m running Google Chrome, but this will work with any other browser you’ve installed on your computer.

Windows 11

  • Select Settings > Apps > Default apps
  • In the section Set the defaults of apps, you can either scroll down until the preferred web browser appears or enter the name into the search apps field. Select the application.
On the top of the list of your browser’s options, There should be the “Set your default” click.
  • On the top of your list you’ll likely see a line that says Select [browser’s name] as Your default internet browser and to the right there is a button that reads Make default. Click the button.
  • A variety of related to browsers will be listed below, in an underhead that says Set default type of file or link. If you click the Set default button, a few of them, but not necessarily all will be switched between Edge to the preferred browser.
  • Windows 11
“Set default “Set default” will redirect important kinds of files to your web browser. You can also choose to set them separately.
  • Check for formats of the files you were assigned by Edge For example . HTM, .HTML, HTTP, HTTPS, and perhaps . PDF (unless you have a different PDF reader that you prefer). Select any that has not changed and you’d like to switch.
  • Make sure to be aware of the fact that there might be certain kinds of files that don’t support your browser an alternative.

Notice that when it was first released, Windows 11 made it very difficult to switch default browsers. However, depending on the preferred browser the process of switching could be much more straightforward than this. As an example, at the time this article was written in the beginning, the first time I started Firefox it asked me whether I wanted it to be the default. I said yes and then when I was in the default applications section of the setup I discovered the following: Firefox is now selected to be the default application for. HTM, HTML, .HTTP and . HTTPS files.

The Firefox default wizard is able to change certain — but not all of the browser’s file settings.

It won’t fix everything.

But wait, there’s more. Even if you change the default browser to one different from Edge but you’ll still be able be using Edge as the default browser for many Windows applications. For example, you can open Windows 11’s latest Widget pane (by clicking the Widgets icon in the taskbar, which appears to be a two-paned window) Click to open one of the articles you see in the pane — and the button will bring up Edge.

If you find this annoying you find it annoying, there could be an app that can help. To access Edge-specific links, you have to follow the steps below:

  • Visit Settings > Applications > The default apps.
  • Scroll down until you’ll see Select the defaults for link type.
  • Click on it to open the search box marked the defaults for Link Types enter Edge.
  • Under the name Microsoft Edge You’ll see (a little redundantly) Microsoft Edge. When you click that, you’ll find any other browsers you can open these specialized hyperlinks.

It’s interesting to note that If it’s Chrome or Firefox and you won’t be able to see them as options. If you download the Brave browser and you will find Brave as an alternativeIf you select this option, every time you hit a news source within the Widget pane it will show up in Brave.

Windows 11

Another option is a program known as EdgeDeflector. It was developed to intercept hyperlinks within Windows 10 that were Edge-specific and then rewrite them on in the background so that they could be opened with your default internet browser. I conducted a bit of research and discovered that its most recent version of the program, v1.2.3.0 is compatible with Windows 11.

I installed the app and followed the instructions for setting up. However, even though it worked on most hyperlinks however, when I clicked an article from the news sources listed in the Widgets pane the link didn’t work as the link was opened in Chrome but no graphics went through. I’d recommend keeping an eye on this application however…

Windows activation and Change product key

Windows 11/10] Windows activation and Change product key

Windows 11/Windows 10 activation can either be done with a digital license or by entering a 25-character product key. A digital license was inserted into your ASUS motherboard to activate Windows. To activate Windows, if you bought a retail edition, you will need either to enter a product code or log in to a Microsoft account. You can also enter a new product code to modify the Windows 11/10 edition. For example, to upgrade from the home edition to the professional edition.

You can find the appropriate instruction using the current Windows operating system on your computer at the following link:

Windows 11 operating system

Check Windows activation status

View Windows activation status

  1. Search [Activation Settings]1 using the Windows search bar. Click [Open]2.
  2. Your Windows activation status is listed next to Activation3

Windows product key

  1. Search [Activation Settings]1 using the Windows search bar. Click [Open]2.
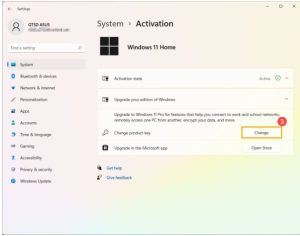
  2. Expand the Upgrade your Windows edition file and click [Change] in the Change product key.
  3. Enter a product code with a 25-character4 code, then choose [Next]5 for activation.

How do you deal with “Windows hasn’t been activated?”

Change Windows product key

Window activation is required for ASUS’s Windows-based computer system. Windows is sometimes not activated in some cases.

  • Windows has not been activated after the product was repaired
    Windows will automatically recognize it as “not activated” if the Motherboard and CPU are replaced.
    Engineers can help clients activate Windows for regular repair.
    If the computer being repaired does not have a hard drive, then this would be an exception. Contact ASUS Service Center.
  • Replacement of main parts
    As mentioned before, Windows wouldn’t be activated if customers replaced the main components.
    You can either reset all settings or contact ASUS’s service center.
  • System Upgrade (including downgrade & upgrade)
    There is a short-term Windows Upgrade Plan available after the launch of Windows 8.
    Windows 10 upgrades to Windows 11 are an example. Contact Microsoft if “Windows has not been activated” occurs.
  • Customers buy the Windows (retail version)
    Customers who purchased Windows (retail) by themselves and installed it in ASUS products will be notified that Windows has not been activated.

Windows 10 operating system

View Windows activation status

  1. Search [Activation Settings]1 using the Windows search bar. Click [Open]2.
  2. In the Activation Section3, you will see Windows activation status.

Back To Table of Contents

Windows product key

  1. Search [Activation Settings]1 using the Windows search bar. Click [Open]2.
  2. Select [Change Product Key]
  3. Enter a product code with a 25-character4 code, then choose [Next]5 for activation.


How do you deal with “Windows hasn’t been activated?”

Window activation is required for ASUS’s Windows-based computer system. Windows is sometimes not activated in some cases.

  • Windows has not been activated after the product was repaired
    Windows will automatically recognize it as “not activated” if the Motherboard and CPU are replaced.
    Engineers can help clients activate Windows for regular repair.
    If the computer being repaired does not have a hard drive, then this would be an exception. Contact ASUS Service Center.
  • Replacement of main parts
    If customers replace the main components themselves, then “Windows hasn’t been activated” would also happen.
    You can either reset all settings or contact ASUS’s service center.
  • System Upgrade (including downgrade & upgrade)
    There is a short-term Windows Upgrade Plan available after the launch of Windows 8.
    Windows 8 upgrades to Windows 10 are an example. Contact Microsoft if “Windows has not been activated” occurs.